


Windows 10 - Upgrade Installation

Windows 10 Free Upgrade Offer:
If you’re running Windows 7 SP1 or Windows 8.1 Update, in most cases, you’ll be able to keep your Windows settings, personal files, and most apps when you upgrade to Windows 10. During the upgrade, setup will let you know if there’s anything that’ll be removed—but it’s always a good idea to back up your files before you start upgrading.
Windows 10 System Requirements:
Windows 10 Upgrade Steps:


NOTE: During the installation process, your screen may flash and computer will restart a few times.
# Click on Customize settings


(Wait for Sometime)
Windows 10 is Ready to use
If you like, you could use Disk Cleanup to delete the Windows upgrade log files, Previous Windows installation, and Temporary Windows installation files items to free up the large amount of space that they take on your hard drive.
This step will delete the C:\$Windows.~BT and C:\Windows.old folders.
# Also Delete SoftwareDistribution Folder:
> Navigate to C:\Windows\SoftwareDistribution\Download and delete whatever is inside this folder.
If you delete the Windows.old folder, you will no longer be able to go back to a Previous version of Windows.
>> How to Delete Windows.old Folder in Windows 10
.
Windows 10 Free Upgrade Offer:
If you’re running Windows 7 SP1 or Windows 8.1 Update, in most cases, you’ll be able to keep your Windows settings, personal files, and most apps when you upgrade to Windows 10. During the upgrade, setup will let you know if there’s anything that’ll be removed—but it’s always a good idea to back up your files before you start upgrading.
Windows 10 System Requirements:
- OS: Windows 7 OR Windows 8.1
- Processor: 1 gigahertz (GHz) or faster
- RAM: 1 gigabyte (GB) (32-bit) or 2 GB (64-bit)
- Hard disk space: 16 GB
- Graphics card: Microsoft DirectX 9 graphics device with WDDM driver
- Display: 800x600 screen resolution
- Internet access to activate
- Click Here for More Details
- Windows 8, 8.1, or 10, mount the ISO file.
- Windows 7, you will need to Extract the files in the ISO to a new folder on your desktop, open the folder.
- Open Bootable Windows 10 USB / DVD
Windows 10 Upgrade Steps:
- Run the Setup.exe file to start Windows 10 Setup

- Windows 10 Setup will now start preparing.
- Select Download and install updates OR Not Right Now, and click on Next.

- Windows 10 Setup will now start getting things ready.

- Click on Accept for the license terms.

- Windows 10 Setup will now check for and install any available updates.
- Windows 10 Setup will now check compatibility to make sure you're ready to install.

- When ready, click on Install to start upgrading to Windows 10

- If you would like to change what you keep in the upgrade, then click on the Change what to keep link, choose what to keep, click on Next,

- Windows 10 Setup will now start upgrading Windows.

NOTE: During the installation process, your screen may flash and computer will restart a few times.
- When ready, click on Next.
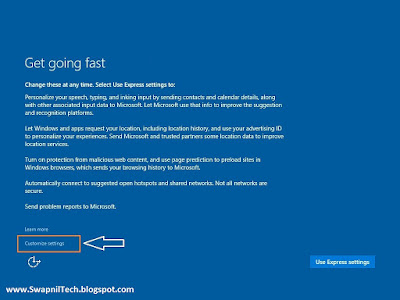
- When you reach this point, click on Use Express settings OR Customize settings for how you want to set these settings,

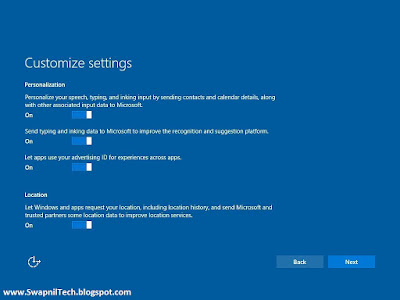
# Click on Customize settings
- Turn On or Off the Personalization and Location settings you would like, and click on Next. (Turn Off Everything)

- Turn On or Off the Browser and protection and Connectivity and error reporting settings that you want, and click on Next.
(Turn Off Everything)

- Windows will now check for an Internet connection.

- Click on Next
(Wait for Sometime)
Windows 10 is Ready to use
- Make sure that you have the correct time zone, date, and time set.
If you like, you could use Disk Cleanup to delete the Windows upgrade log files, Previous Windows installation, and Temporary Windows installation files items to free up the large amount of space that they take on your hard drive.
This step will delete the C:\$Windows.~BT and C:\Windows.old folders.
# Also Delete SoftwareDistribution Folder:
> Navigate to C:\Windows\SoftwareDistribution\Download and delete whatever is inside this folder.
If you delete the Windows.old folder, you will no longer be able to go back to a Previous version of Windows.
>> How to Delete Windows.old Folder in Windows 10
.
Post a Comment